

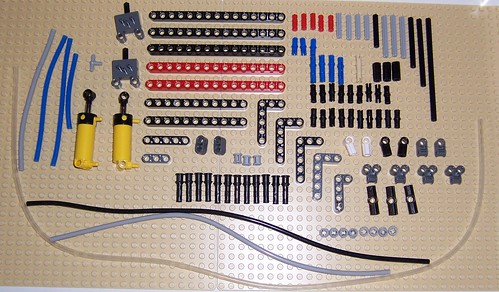
 When I realized I'd have only one week between LEGOPalooza and Robot Rumble in which to build a new robot, I decided I needed to pick a small project to do. Having already sized up the 2010 LEGO TECHNIC Log Loader (8049) kit to determine that it included the necessary pneumatic elements to build a simple pneumatic walker, I decided to try building a walker with that set. So with one week on the clock, the challenge was set: build a functional walker, controlled by a pneumatic circuit, without cutting tubes, and without using any parts that aren't found in that set's box (and at the same time, leaving most of the set's parts still available).
 The version brought to Robot Rumble was a bit rough, strained a few parts, and squeaked when certain parts rubbed together (this came in at 100 pieces). A revision was needed (this came in at 109 pieces). I made instructions for both versions (1, 2). I only recommend the second version, which features my later performance improvements. You might be able to make another walker that runs even more smoothly using the parts from this kit, but as far as I am concerned this challenge has been met.
The easiest way to browse the photos that make up the instructions is via flickr. You can come back and read the description of what's going on in this model after you've tried building it (it's alright, it'll still be here).
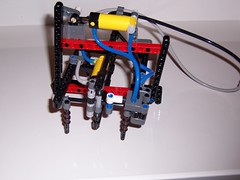
Pneumatic logic works in much the same way that electronic logic works, but instead of electricity controlling the flow of electricity, pressurized air is controlling the flow of pressurized air. You can actually use LEGO pneumatics parts to build a variety of logic gates. There's nothing stopping you (in theory) from building an entire computer out of nothing but pneumatic logic gates. Personally, I like the pneumatic circuit I used in this model as an extremely primitive example of a two-bit pneumatic counter with no carry-over digit (yes, I'm just that nerdy). When you're limited to this few valves and pistons, though, it's hard to do much in the way of complex circuitry - so you don't really need to understand logic gates to follow what's happening here. Eric Brok documented this sort of pneumatic control system some years ago, and did it in a clear, less nerdy way, complete with color-coded schematics. In my model, the white parts show you where a piston is connected to a valve, and the pistons control each other's valves like in Eric's first illustration.
Pneumatic walkers were once considered something of a fad and a classic project among LEGO Technic fans. Pneuma-Ped is a good example of a somewhat more complex model, but some of the ones on LUGNET's list are much more ambitious (also, expensive and parts-intensive - the difficulty of getting pneumatic elements at a good price is part of why I set this challenge to myself to use only parts from one kit that's currently widely available).
I highly recommend buying this set from one of these two links (I receive a small commission for each kit bought through these links):
Buy LEGO TECHNIC Log Loader (8049) via LEGO Shop-at-Home
Buy LEGO TECHNIC Log Loader (8049) via Amazon
If you want to try something similar without this kit, or buy additional parts to build a more complex machine like this one, you can order parts online. Some LEGO pneumatic elements are currently available (in some cases, exclusively available) through LEGO Education. All manner of LEGO elements can be bought individually through various sellers on BrickLink.
Instructions style and the "take photos as you take it apart" technique blatantly ripped off of http://nxtprograms.com/
My design is fairly similar to one I've blogged previously for LMOTD. Since that builder was working towards a different challenge (building the smallest possible walker), the end result is actually quite different. The similarities come from using it as inspiration - I'm having a hard time recalling if I was inspired by any other two valve / two piston walkers, but I liked the hexapod mechanism here and can't seem to locate other simple walker links offhand (if you have links I should share or cite here, feel free to drop me a line at 316danny@gmail.com)
EDIT 4/28/2010: There's now a video of this in action (thanks to Jesse Bikman, who took this video at Maker Faire NC and has added it to that show's flickr pool).
4 comments:
nice challenge and looks like a good solution, thanks for the instructions. Any chance of a video to show the lazy how it works?
Sure - it'll have to wait until after next week's show, but it could happen.
Someone took a bunch of photos for a stop-motion graphic of it at the last Triangle Amateur Robotics meeting - so we might have an animated GIF of it up somewhere soon too.
We have video! Someone took this one at Maker Faire NC this past weekend:
http://www.flickr.com/photos/jessebikman/4554444879/in/pool-1378293@N23/
No "aha" moment because I had to watch it quite a few times but I see it now. It's obvious when you know how but know how is the hard part!
Thanks for the post and to Jesse for the video.
Post a Comment